Fiberglass Repair
Fiberglass Repair doesn't have to be hard. It just takes an understanding of the fiberglass materials used to repair Wrangler Hardtops. Fiberglass isn't difficult to work with. The only hard part is the timing and understanding of the resin to catalyst ratios and when it should be adjusted.
Why do I know a bit about Fiberglass Repair?
First allow me to give you a brief history of myself. On YouTube, Jeep Forums and FaceBook Groups everyone knows me by my YouTube Channel Power Addicts. Before I got into building Jeeps, motorcycles and other cool rides I worked in a few different fiberglass factories. The big names being Harbor Master Houseboats and Gibson Houseboats. I was one of the lead mold designers for Gibson Houseboats for a few years. I've built molds from raw materials such as plywood, sculpting plasters, body fillers, fiberglass, and Gelcoat just to name a few of the materials I used to create molds to build those awesome boats. I've also done private work for taxidermist creating molds for animal mounts. Not to mention years of experience in houseboat reconstruction/remodeling. Molding custom parts for cars and boats as well. Oh yea .. and fiberglass repair of all those mentioned. Well .... do ya get the point .. I know fiberglass.
Now .. to be 100% totally transparent. I have worked and designed many many molds and fiberglass parts for many companies throughout life. But .. I owe my dad for teaching me the art since I was a young child. I've worked with many skilled fiberglass craftsmen. I'm not saying this because he is my dad .. but I've watched him turn raw materials into art!!! He is the best that I have ever seen!!
Is this page about Jeep Wrangler Hardtop Fiberglass Repair?
Well kinda sorta ... I'll link the YouTube video playlist below to allow the videos to teach you about the procedures and methods to repair a busted up Wrangler Hardtop. It will show the video on "CJ7 Hardtop on a YJ". Click the list icon in the upper right corner to pick the video to fit your hardtop repair needs.
This article is more about explaining how to work with fiberglass, the ratios of resin to catalyst, different materials to use and when and of course safety in doing fiberglass repair. Basically this article is also a way to keep from me regurgitating the same spill on every video. I really would like to keep the video time length to a minimum to prevent boring you to death. So hopefully this article will give you enough information to give you an idea to start mixing your own fiberglass.
Types of Fiberglass Resins
Lets just cover the 3 main types of resins used with Fiberglass, Carbon fiber and Kevlar. Now ... for the record, carbon fiber and Kevlar will not be covered in this article. Remember you are here to learn to do fiberglass repair on your Jeep, not super lightweight race boats or bullet proof panels. Hmm .. but that does sound fun.
Ok lets get back to the types of resins.
Epoxy is usually the most expensive of the 3 mentioned. But, it is for a good reason. It is the strongest of the resins. Epoxy adheres to Carbon Fiber, Fiberglass and Kevlar very well and creates a virtually leak-proof barrier. Epoxy also sticks to old epoxy and most other materials well which aids in the fiberglass repair of applications that use this type of resin. Due to its cost, it is not used in general purpose applications. So, I will not be covering this resin in detail.

Vinylester is a hybrid between Epoxy and Polyester. It isn't as strong as Epoxy, but it is must stronger than Polyester. It doesn't bond well to Carbon Fiber or Kevlar but it works well with Fiberglass. It is by a large margin more expensive than Polyester so therefore is not used in general construction applications. What is it used for you ask?? Good question!! Vinylester resin is the most corrosion resistant to fuel, vapor and harsh chemicals.

It is very heat resistant, excellent impact strength and tensile strength. Due to its blended thickness it works very well in vacuum formed fiberglass products. Being that this article is also pertaining to repairing Jeep Hardtops, we will not be covering this resin in detail because it does not stick to Polyester resins well which is what most hardtops are made of.
Polyester resins ... aa yes!! Here we are with the stuff you will be using the most in Jeep Hardtop fiberglass repair. Now after all the hype about the strength of the fiberglass resins mentioned above, it might lead you to believe that this stuff is weak. Nope .. its still really stout stuff!! Because we like to buy lots of cool Jeep parts, luckily this stuff is the least expensive of the three main types so we can spend the saved money on cool stuff!!
Polyester resins should only be used with fiberglass materials. It does not work well with Carbon Fiber or Kevlar.

If you are getting your resin at the hardware store, auto part store or even off of Amazon, odds are it is "general purpose" Polyester "summer" blend.
What do I mean by that??
Well basically there are 2 different blends of Polyester resins. Those blends are "summer blend" and a "winter blend". The summer blend is what you would purchase at any of the stores mentioned or even Amazon and is typically light brown in color. The winter blend you would normally get at a commercial fiberglass supply house and is Purple in color.
The difference between the Summer and Winter blend is how fast it cures. Since the winter cold drastically slows down the curing time of fiberglass resins, the winter blend gets an additive blended in that makes it "kick off" much faster. That additive is what gives the winter blend it purple color.
First a little Fiberglass Repair lingo to help us both out
First I wanna explain some "slang" used in the industry. There will mainly be 5 terms used to describe different curing speeds or situations.
Those terms are:
Fire it up, Fired .. etc = the act of adding the catalyst to the resin to activate the curing process.
Kick or kicked off = means the resin is starting to cure or harden. Spoken sentence would be "The resin has started to kick". This means the resin is starting to gel and you are running out of time to work with it.
Cold, Light, Slow = means the catalyst to resin ratio is mixed to allow plenty of curing time before the resin starts to harden. A spoken sentence would be "Fire this batch cold (or slow)". This sentence means add less catalyst to the resin to lengthen the curing time.
Warm = means add a bit more catalyst to speed up the curing time but not too much to make it kick off too fast.
Hot = means add enough catalyst to make it cure fast. A spoken sentence would be "Fire this batch hot". This sentence means add more catalyst to make it kick faster. BUT FOR SAFETY SAKE ... NOT TOO HOT!! I'll explain more on that later.
Using the "slang" terms helps me write these articles faster. Also, when/if you start working with people who are experienced in fiberglass repair you will already have a grasp on what they are talking about.
Dude!! Get on with the catalyst part!!
Ok .. fine!! (Sorry the voices in my head are starting to argue :-)
Types of catalyst used in fiberglass repair
Now that we have covered the resin and slang terms used in fiberglass repair, lets cover the catalyst that activates the curing process.
The nerdy name for catalyst is Methyl Ethel Ketone Peroxide otherwise known as MEKP.
Well, to keep this simple, there is a slow cure and a fast cure catalyst and there is a clear and a red version of each.
First lets look at why there is a clear and a red catalyst.
Clear can be used in fiberglass resins or Gelcoat paints. Obviously the clear catalyst will not tint the color of the gelcoat paint. Where as if you used the red catalyst in white gelcoat you will end up with a pink final product once the paint cures. There is a dye that can be added to clear catalyst to make it red. I personally do not use it.
The red catalyst is mainly used in fiberglass resins and fillers. The red tints the resin mix so it gives you an idea of how hot the batch is fired. If the batch is a light reddish brown once fully mixed, you fired it light. The darker red the mixed batch, the hotter the batched is fired. Seeing the color is another way to help you keep the mix ratio consistent. Honestly, you should be using a catalyst dispensing bottle for that. It is much more consistent and safe.
When I purchase catalyst I always get the clear fast cure type. I can then use the mix ratio to control how fast or slow I want it to kick. The clear catalyst will work with resins or Gelcoat. If I want color in the catalyst I have the red dye to mix in. Very rare that I use the dye because I have the proper dispensing bottle to control the about of catalyst I'm adding.
Before anyone asks ... NO ... you CAN NOT use food coloring to dye the mix. The additives in some food coloring will deactivate the catalyst, therefore leaving you with the resin not fully curing or not curing at all.

Whats so special about the mix ratio for fiberglass repair?

The fiberglass resin to catalyst mix ratio can mean the difference between a busted Jeep hardtop being fixed or a cobbled up mess. Meaning .. get the ratio wrong .. the resin cures too fast before you get the fiberglass worked into place .. welp .. you got a mess.
Now, don't let that scare you. Even if the resin hardens before you get the Jeep top fixed it is not the end of the world! Simply sand down the hardened resin and keep repairing the hardtop. No big deal!!
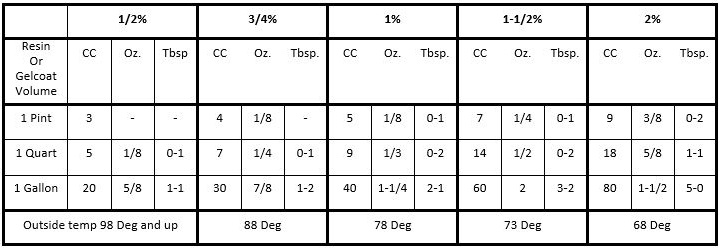
The catalyst to resin ratios are technically measure in weight. But as you can see on the charts its being shown as a fluid measure (check out the full page graphic to get you a free printable chart). That is because of the specific weight of each product per fluid volume. In simple terms .. a gallon of resin weights approx 9.2 pounds. The amount of catalyst needed is added based upon the weight of the amount of resin you are mixing. Its easier and much more convenient to measure fluid amount than weighing a cup each time you need a new batch.
With any fiberglass repair, there IS a bit of a learning curve. Keep trying till you get it fixed! Your Jeep Wrangler is worth it ... right?? Yea ... that's what I thought!! Keep learning that new skill!! Ya never know, keep practicing you can get good enough to earn a good side income fixing Jeep hardtops.
Trust me ... Dad and I both have made a VERY GOOD living doing fiberglass repair on houseboats! Now .. I do Jeeps :-)

SAFETY NOTE!!!
Just a quick safety note about if you accidentally mix it WAY too hot. Once the resin starts to kick it generates heat. The hotter you fire the batch the more heat it generates. The stuff can actually get very violent if way too much catalyst is added. It will literally start to boil (in its own weird way) eventually starting to smoke and can even start projecting hot balls of resin out of the container.
Always keep a bucket of water close!! If it starts acting violent like that, drop the whole batch container and all in the bucket of water. The water contains the craziness of the hot resin, it speeds the cooling process and it also kinda "deactivates" any resin/catalyst that hasn't fully cured. See the importance of newbies using the proper catalyst dispensing bottle??
Fiberglass repair safety - VERY IMPORTANT!!!
Doing fiberglass repair is easy once you get the hang of timing the resin. It is even safe as long as you follow a few important rules.
Eye Protection - ALWAYS wear eye protection when mixing and working with fiberglass, resin and catalyst. Grinding and sanding your fiberglass repair can stir up lots of dust and debris. It can easily get in your eyes! That fiberglass dust is like little tiny glass shards. Trust me ... IT HURTS!!

Skin protection - Gloves to protect you hands from the harsh chemicals. Long sleeves to protect your skin from grinding dust or harsh chemicals. Better yet wear paint suites like these to maximize your protection.

Breathing Protection - Protect those lungs while doing fiberglass repair or fabrication! The vapors from the chemicals are VERY rough on your lungs!! When working with the resin and catalyst mix at the very least make sure you are NOT in a confined area and use breathing protection!! You MUST have plenty of air movement and ventilation. I am not saying this just to keep the safety police happy. I have helped pull fellow workers out of houseboat engine rooms from the vapors poisoning their system. They were OK after getting some fresh air for a while. Please ... seriously the vapors are NO JOKE!!
When sanding or grinding the fiberglass repair, use at least a quality dust mask. The paint respirator shown in the picture is still the preferred safety protection.

Jeep Hardtop repair suggested materials
These products I am presenting are good for the consumer looking to do fiberglass repair, whether it be Corvette bodies, boats or repairing a Jeep hardtop. I do have my own supplier for my materials being that I purchase in bulk. With that being said, I do feel comfortable recommending these products to you.
For a container to mix it in .. just use any paper or plastic container. But ... DO NOT use any type of foam cups or containers!! Well, unless you want a mess and wasted resin all over the place. Trust me .. just use paper or plastic and you will be fine. What to stir it with? Heck, I'll pick a stick up out of the yard if its close.
This is the fiberglass kit I feature in most of my videos. The catalyst that comes with the kit seems to be the slow acting kind. This is a good thing for the beginners because it gives you a bit more time to work before it starts hardening. This kit is actually a great value for the money. It comes with a gallon of resin, catalyst and 15' of fiberglass mat. That is typically more than you will need to repair a hardtop. I'll comment more about this kit later in the article.
This kit is what you typically find on your autoparts, hardware or department stores. Its a good kit for small repairs but it does not come with the chopped mat. DO NOT buy just fiberglass cloth. Fiberglass cloth by its self is very weak. It has got to have the mat beneath it. I'll add recommended fiberglass mat next.
For optimal strength in Jeep Hardtop Repair your MUST use fiberglass chopped strand mat. Even used by its self it is strong! Use it below fiberglass cloth for a strong yet cosmetically pleasing repair to work with. Cloth is a "pretty" layer, it isn't worth much else.
This little tool is a MUST when working with chopped strand fiberglass mat. Yes, you can tamp the air out with a cheap paint brush. This roller does what the paint brush wishes it could do!! I have several different sizes for different purposes. This particular size is pretty much universal for most repair jobs.
These cheap little disposable chip brushes are what I use to wet out the material and even remove air in some places. You can get them at any hardware store but the prices through Amazon are kinda hard to beat honestly.
I've done fiberglass repair for so many years that I can pretty much mix by eye. For the newbies out there, these cups would work great for yall!!
Fiberglass Repair Videos on Jeep Hardtops
If my YouTube videos and website has helped you. Please help supprt FixJeeps.com by making you purchases though Amazon. I get a small commision that cost you not a penny more. It helps support the site and more educational projects for you to see. Thanks!